Pre Winter Roof Check: 5 Warning Signs You Can’t Ignore
Commercial and industrial roofs are business assets — and winter is when small issues can ripple into downtime, product loss, and safety concerns. Building owners and facility managers don’t need a sales pitch — they need clear signals to watch for, why those signals matter before the first freeze, and practical next steps that protect budgets and operations.
Below are the five warning signs we’re called about most in Kentucky and Indiana. Use them to triage your sites, prioritize work, and set an action plan that keeps operations on track all winter.
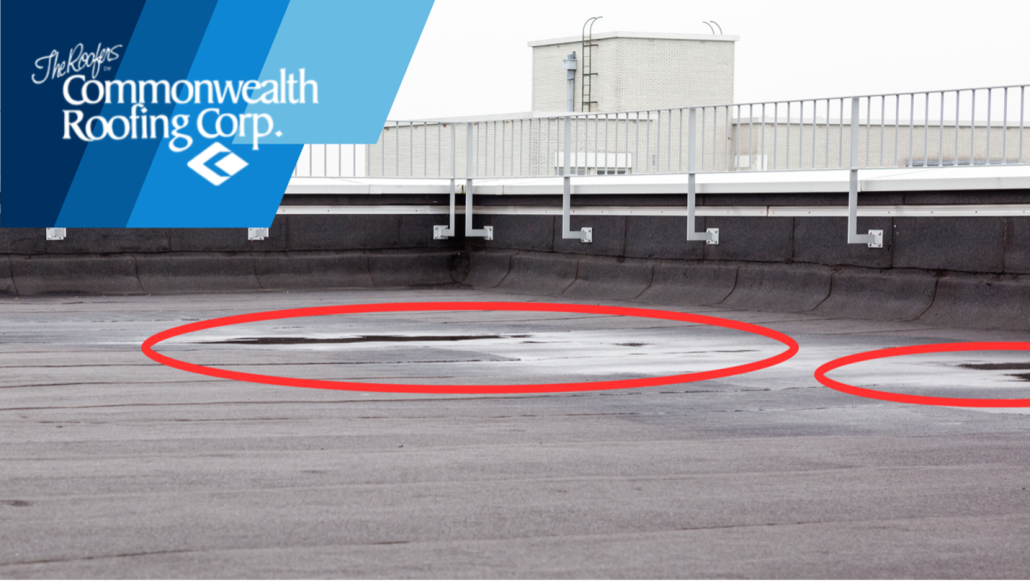
1) Ponding water and slow drainage
What you’ll see:
• Water that lingers more than 24-48 hours after rain or snowmelt
- Depressed, dish‑shaped areas in the membrane
- Clogged strainers, debris‑packed scuppers, conductor heads that overflow
Why it matters before winter:
- Freeze‑thaw cycles expand trapped water, prying at seams and accelerating aging
- Added water weight stresses older structures and roofs carrying heavy equipment
- Persistent ponding invites biological growth and dirt accumulation that further slows drainage
What to do next:
- Clear drains, strainers, and scuppers; verify internal drain lines with a controlled water test
- Document recurring ponding with time‑stamped photos after storms
- Engage a commercial roofer to evaluate slope, add crickets, and optimize drain locations where necessary
2) Seams, flashings, and terminations under stress
What you’ll see:
- Open laps on TPO or PVC, split seams on modified bitumen
- Cracked mastics, loose term bars, gaps at parapet transitions
- Flashing pulled from walls, curbs, and skylights
Why it matters before winter:
- Cold contraction widens marginal laps and terminations — small gaps become pathways for wind‑driven rain and snowmelt
- Once moisture gets behind the membrane, it can travel horizontally, saturate insulation, and corrode metal decks
- Saturated insulation loses R‑value, raising energy spend just as heating demand peaks
What to do next:
- Have qualified technicians re‑weld thermoplastic seams, repair EPDM with manufacturer‑approved methods, and re‑secure terminations
- Audit high‑movement details — expansion joints, parapet corners, wall transitions — which often initiate leaks
- Ensure repair methods preserve any active manufacturer warranties
3) Rooftop equipment and traffic damage
What you’ll see:
- Deteriorated pitch pans or missing pourable sealer
- Cracked pipe boots, loose counter‑flashing at HVAC curbs
- Punctures and scuffs along service routes, especially near ladder landings and unit clusters
Why it matters before winter:
- Cold weather increases mechanical service calls, which increases foot traffic
- Ice and snow obscure hazards and magnify slip and puncture risk
- Compromised curbs and penetrations are direct conduits for water into plenums and occupied spaces
What to do next:
- Install or refresh walkway pads along routine service paths and around units
- Rebuild pitch pans, replace degraded boots, and verify curb heights and fastener schedules
- Coordinate access protocols with your roofing and mechanical partners to minimize incidental damage during winter service
4) Perimeter edge and coping securement
What you’ll see:
- Loose fascia or coping, open joints, visible fastener back‑out
- Metal that rattles during wind events or looks slightly lifted at corners
- From grade, wavy or misaligned edge conditions on long runs
Why it matters before winter:
- Perimeters and corners see the highest negative pressures in storms — loose components can unzip adjacent membrane
- Compromised edges elevate both leak risk and the potential for progressive damage under uplift
- If sections detach, they can become wind‑borne hazards that trigger safety and liability issues
What to do next:
- Re‑secure or replace compromised sections; confirm clip spacing and fastener patterns meet current standards
- Verify continuous, compatible sealant at joints and behind face metal
- Pay special attention where coping meets drains and scuppers so meltwater exits freely
5) Evidence of trapped moisture in the system
What you’ll see:
- Blisters, ridging, or a spongey feel in BUR or modified roofs
- Isolated soft spots on single‑ply systems
- Discolored ceiling tiles, damp insulation smells near walls or columns after rain
- Rising energy usage that can’t be explained operationally
Why it matters before winter:
- Wet insulation loses thermal performance and invites freeze‑thaw damage
- Moisture migration can turn a small repair into a sectional tear‑off if ignored
- Persistent dampness can corrode steel deck, degrade adhesives, and compromise fire ratings
What to do next:
- Schedule an infrared moisture survey to map suspect areas, verifying with core cuts where appropriate
- Prioritize targeted removal and dry‑in repairs to stop lateral moisture spread
- Use survey data to plan — repair, restore, or replace — based on objective scope, age, and risk
Repair, restore, or replace — a practical decision framework
Facility leaders often face the same question across multi‑site portfolios: Which option protects the asset and cash flow?
- Localized defects, otherwise sound system — Targeted repairs and a preventive maintenance plan deliver the best ROI
- Surface aging, dry insulation, manageable detail work — Consider restoration with compatible elastomeric or silicone coatings to extend service life and enhance reflectivity
- Systemic failures, widespread wet insulation, end‑of‑life membranes — Plan phased replacement by risk area or production schedule to minimize disruption
Tie decisions to measurable goals: leak rate reduction, energy targets, warranty requirements, and safety compliance. Capture pre‑ and post‑work photos so future audits are straightforward.
What a pre‑winter commercial roof check from Commonwealth Roofing includes
When you engage our team, expect a structured, no‑surprises process designed for busy operations:
- Roof asset documentation — plan‑view photos, condition notes by area, and a clear map of findings
- Prioritized action list — what’s urgent before winter, what to monitor, and what to budget over 12-24 months
- Repair and restoration options — manufacturer‑compliant methods that protect warranties and meet current codes
- Budget clarity — scoped proposals with alternatives so you can balance risk and cash flow
- Safety and scheduling — site‑specific plans that align with your EHS requirements and production windows
- Preventive maintenance — drain cleaning, detail tune‑ups, and seasonal visits calibrated to your system and traffic patterns
Our field teams work daily on TPO, PVC, EPDM, modified bitumen, built‑up, and metal systems — recommendations are tailored to your facility, not a generic checklist.
A quick, ground‑level self‑audit you can do safely
After a steady rain, walk the perimeter and note:
- Overflowing conductor heads or downspouts
- Debris trails on canopies and dock covers that hint at upstream drainage issues
- Edge metal that looks lifted, wavy, or mismatched at corners
- Interior water staining near exterior walls or column lines
Capture photos, dates, and roof area references. This simple documentation speeds diagnosis and helps prioritize the least‑invasive fixes first.
Bottom line
If you’re seeing ponding, stressed seams and flashings, traffic‑related damage, loose perimeter components, or signs of trapped moisture, act before temperatures drop. A focused pre‑winter roof check turns unknowns into a clear plan, reduces mid‑season emergencies, and supports better capital planning across your portfolio.